The ultimate guide to keeping your sofa covers looking brand new for as long as possible

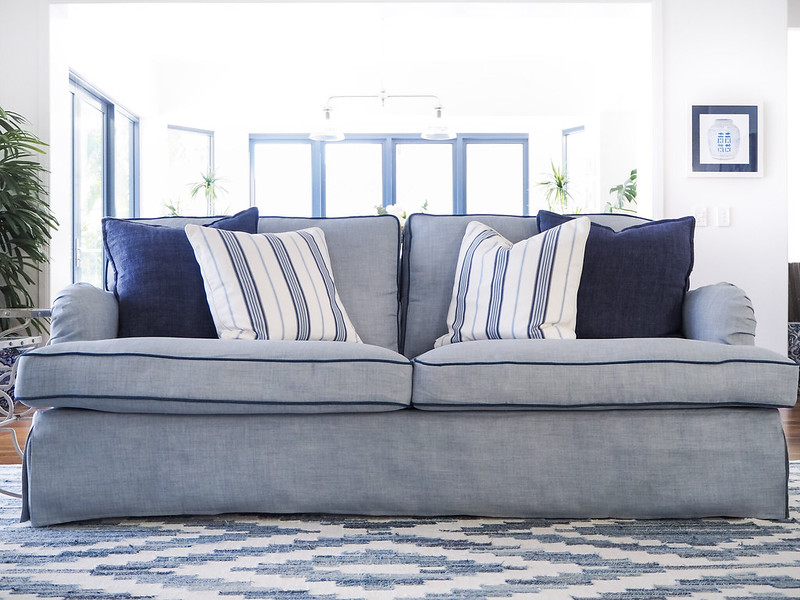
Sofas – they’re our second home in a home. You can’t deny the feelings of joy and comfort whenever we sit on them or sprawl out for a cat nap. In fact, the relationship with our sofa extends beyond any other furniture piece in the house – they were there with us for our meal sessions, movies, gossip and so much more.

Having stayed with us through the ups and downs of life, we should pamper our sofa by giving it a new refreshed look, either by washing its existing slipcovers or getting some new slipcovers for it altogether. I mean, that’s also the best way to take care of our sofa and keep it looking lively in the long run, right?

Depending on the fabric of your sofa slipcover, there are different ways to care for it. The fabrics’ ability to be machine washed is one of the things I consider whenever picking a sofa slipcover because that very well means the difference between hours of furious (but careful) scrubbing or a quick bung in the washing machine. 

To help you prolong the life of your slipcover, we’re listing out some ways you can care for your slipcover according to its material. For starters, here are some important things to keep in mind when you do decide to wash your slipcovers (bear in mind that each fabric has its own way of being taken care of but more of this can be found down below) :

  1. Wash all your slipcovers in one go to ensure that they all come and leave in the same colour!
  2. Don’t crowd your washing machine – if it’s only the slipcovers that can be fitted in, then that’s it. No shirts, jeans or socks!
  3. Check the components of your detergent before using it because there may be a bleaching agent hidden in them (even if it doesn’t say “bleach” outright, hydrogen peroxide is organic but has bleaching properties for example)
  4. Turn your covers inside out when washing them – it’s an attempt to keep the colours as they are.
  5. Zip the zippers! because leaving them swirling around the waashing machine may snag and cause some damage to your machine (and covers)
  6. If fading happens, breathe! All fabrics are bound to lose some colour as they age (much like our hair colour…) but it’s all part of the charm. Embrace it!

100% Cotton

Cotton has been around with us for a really long time. Fun fact, the Aztecs once used cotton as money for trade.

A versatile fabric that can easily be dyed into various colours, it is no wonder cotton is such a common and important fabric in the industry. 

To keep your 100% cotton slipcover  looking fresh, it would help to take note of the following:

  • Always use cold water for washing. Do not wash cotton fabrics in hot or even warm water.
  • Choose the gentlest cycle if you are using a washing machine. No washing this natural fabric violently please!
  • Avoid the dryer as this may cause the fabric to shrink.
  • Drip dry your slipcovers because that helps to avoid wrinkles too!
  • Slip them back on while it’s slightly damp because cotton fabrics naturally shrink a little as they dry.
  • Iron with low temperature while it’s damp if you need to but remember, nothing too hot!

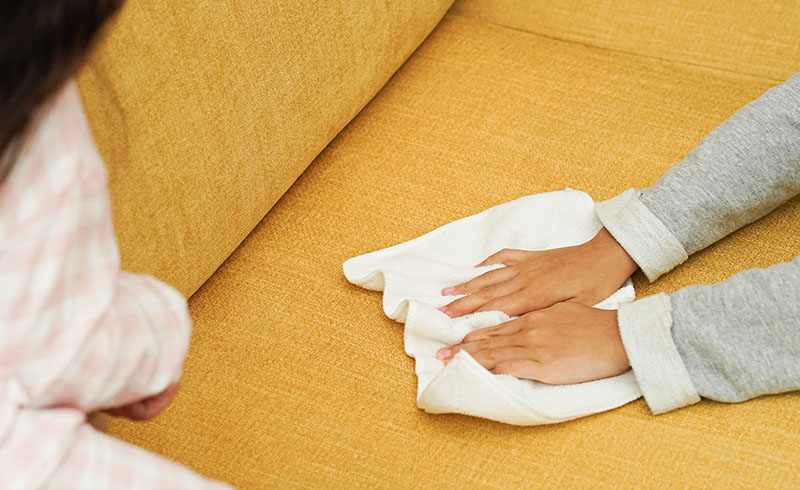
If you’re only looking to clean a spot, always test out on an inconspicuous area first and foremost. If there aren’t issues, put some detergent on a wet cloth and press it against the affected area. Keep dabbing at it gently until the spot is cleaned up. Once it’s clean, use a dry cloth or paper towel to help absorb the excess moisture and quicken the drying process.

Polyester / Polyester Blends

Ever wonder why polyester fabrics just seem to last so long? The secret lies in what they’re made of. Polyesters are man-made fabrics that are built to be last, so you might imagine that they are more robust than natural fabrics such as cotton, wool and linen.

And are they?

Well, it’s certainly true in many ways. Polyester fabrics are unaffected by many chemicals, resistant to shrinking and stretching, and are very durable. It won’t be as easy for a cat to puncture a hole into a polyester shirt as opposed to a linen shirt.

 So how do you care for it?

  • Wash with cold water. Keep it cool guys.
  • Gentle cycles on a washing machine are the best but normal cycles work too. 
  • No direct heat which means, if you need to iron it, iron on low heat. Pro tip: layer another fabric over the polyester when ironing so there’s a barrier between it and the heat.
  • Tumble-dry at low because really, don’t overly dry polyester fabrics as it can cause shrinkage
  • Consider steam ironing if you have one
  • If you ask us, drip dry is the way to go 

If you’re only looking to clean a spot, it’s the same as how you would care for cotton. Use a wet cloth which has some detergent on it and work your way around that horrible spot that’s ruining your covers. dabbing at it gently until the spot is cleaned up. Once it’s clean, use a dry cloth or paper towel to help absorb the excess moisture and quicken the drying process.

Pure Linen

Always looking elegant and having a real rich touch, linen fabric will win the hearts of almost everyone. And by everyone, we mean even our ancestors. 

Fun fact, linen was used for mummification in ancient Egypt so these things are the good stuff. If you do a quick history search on linen, you’ll find out that a lot of people back then (and now) preferred Linen because it was a symbol of purity.   

And we can’t disagree, but how do you take care of these thin and comfortable (but expensive) fabrics?

  • Try to limit machine washing to once or twice a year because they get thinner with each wash.
  • If you have to wash them, do it in lukewarm or cold water.
  • Use the gentlest cycle on your washing machine
  • Iron on low if required and do it while it’s a little damp.
  • Drip dry in shade instead to avoid creases.
  • Tumble-dry is possible but do it on the low mode 
  • If you need to store your linen fabric, make sure it is in a cool and dry place.
  • If you’re hand-washing, do not wring, twist or scrub the fabric – you’ll thin it faster

If you’re only looking to spot clean, use a gentle cleaning mix on this natural fabric to keep it looking lively. The formula? 50:50 white vinegar and water. That’s right, simply grab a bottle and prepare a potion of 50% white vinegar and 50% water before shaking them together well. Once that’s done, put a little of the potion on a cotton and dab away. 
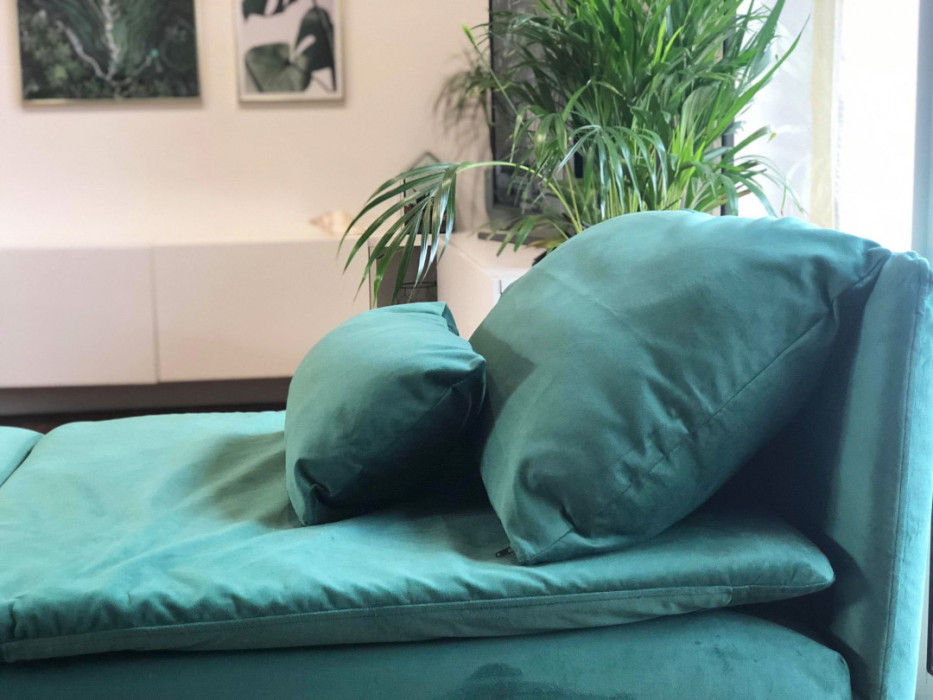
Velvet Blends

Luxury is made affordable with velvet blends. I especially love touching this fabric because of just how smooth it is. Have you tried it before? 

Totally unrelated but the smoothness of this fabric reminds us of red velvet cakes. I suppose that’s how the cake got its name for at least, the velvet part.

When properly taken care of, velvet will last quite awhile and this is obvious when you go to museums. You’ll see that there are plenty of velvet furniture that still looks really good.

  • Remove dirt with a vacuum, brush or a lint roller before sending it to the waters.
  • Hand-wash or set your washing machine to a gentle setting with cold water because you need to contribute to keep it expensive-looking. 
  • Do NOT iron (period).
  • Creases can be removed by light steaming – go in the same direction (think of it as petting your cat)
  • Brush after steaming if you like that lightly sparkled look of the fabric

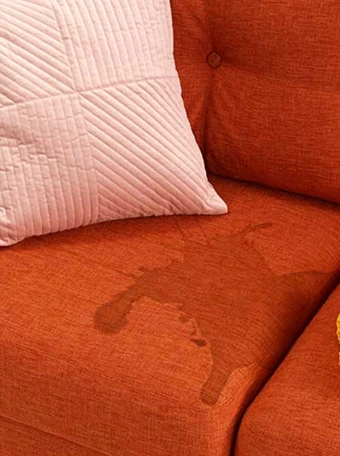
If you’re only looking to clean a spot, dab it clean it as soon as you can! Dry stains on a velvet piece are harder to remove and well, I’d get annoyed if there’s a visible black dot on my beautiful green velvet slipcover.

Bycast & Synthetic Leathers

Please do not, and I repeat, do not throw your leather slipcovers into the washing machine. That’s the worst crime you could ever commit!

Before we teach you how to avoid such an atrocious crime, we’re taking a step back because did you know that real leather was once used as wallpaper? I mean, this was back in the 17th century but I’m still in awe.

Anyway, while real leather as well as bycast & synthetic leathers can’t be machine washed, all hope is not lost.

  • Get rid of the hard dirt first by vacuuming, brushing or using a lint roller for the surface and the in-betweens. 
  • Buff your covers to keep the shine.
  • Do NOT iron.
  • Wait for wrinkles and creases to disappear because they will after being stretched for some time (patience is key my young padawan)
  • Send it to a professional cleaner if you need to because they know best 

If you’re only looking to clean a spot, do it fast because stains can stay. Do not use an overly wet cloth but one that is damp. You could try mixing water with a little dish-washing detergent and dabbing at the spot but always, always try an unobvious spot to see if it may cause discolouration of any sort.

Liquid Resistant Fabrics

If liquid resistant fabrics had existed when we were kids, we would have been saved from a lot of nagging and punishments from our parents. 

Here are some tips we have to care for a liquid resistant fabric:

  • Had an oopsie on the covers and spilt some liquid on the covers? Simply wipe up the spill with a clean towel
  • It’s liquid-proof but not crumb-proof so always vacuum, brush or lint roll whenever necessary.

Though the question is “if it’s liquid resistant, do we need to wash it?” And if yes, how do we even wash it? I mean, wouldn’t washing a liquid resistant fabric be kind of redundant?

Like a good car that gathers dust, you may need to do more than just lint-roll your liquid-resistant slipcover. A good wash always helps to keep it fresh and clean too. Who knows what odors lay hidden within an unwashed slipcover! 

However, a word of caution my fellow friends. What makes a fabric liquid-resistant is the coating that is layered above it so if you do intend to wash your liquid-resistant fabrics, make sure to keep count! It is likely that the coating will wear off after a few washes. 

But if it is washing that you must do, here’s what we recommend:

  • The gentlest cycle and cold water combination for the washing machine is a must.
  • Drip dry in shade or tumble dry on low
  • Put the covers back on while it’s slightly damp to get the best fit
  • No ironing required because it’s wrinkle-resistant!

Most of the time, spot-cleaning should do the trick so don’t fret too much! On that note, we do not recommend the use of spray-on cleaners, but if you must use a spray-on cleaner, make sure to test it in an inconspicuous location first.


Looking for a new slipcover for your sofa but don’t know where or what fabric to choose? Look no further as you’re in the right place and in good hands! Check out our fabric collection here and get some sample swatches delivered to you! 

How to DIY your own cactus cat scratcher

We all know that cats love to have fun playing around with their toys, but they also love scratching.

If you’re a cat lover and love your home, this means one thing: You want to keep your cat happy and active, but you also probably don’t want to have your furniture ruined.

As always, we’ve got you covered (don’t we always?) with this step-by-step DIY cactus cat scratcher building guide that you can follow along to to make your own easily.

Another bonus that we’re super psyched about when it comes to this DIY option? It’s also easy on your wallet.

So let’s dive in and get crackin’ on the ultimate home-made scratcher that your best feline friend will love hanging from and sinking its claws into!

What you’ll need:

  • 15 x 15 inch round plywood (the thicker and heavier the better, as it gives a stable base to the structure)
  • 0.25 inch dia. natural sisal rope, 210 ft. long
  • Green dye (for 160 ft. of rope)
  • Glue sticks (warning: you’ll need lots, so the bigger the pack the better)
  • Glue gun
  • Green spray paint
  • Electric drill
  • 4 wood screws
  • Stones or concrete to fill the ⅓  of the body of the scratcher
  • Fake or felt flowers for a touch of cuteness
  • 4 inch dia. plumbing pipe, 3.2 ft. long (or cut a longer one to size)
  • 1 pipe lid
  • 2 single tees
  • 2 90° elbow pipes
  • 2 3 inch polystyrene baubles

Instructions:

Once you have all the ‘ingredients’ you need, just follow the ‘recipe’ below, while cross-checking with the illustrations in this handy guide.

STEP 1: Take a round wood board (the thicker the better), prepare a drill, 4 wood screws and the lid of the plumbing pipe (which will be the body of the cactus).

STEP 2: Pre-drill the lid, then centre it onto your board, and mark where the screws will go with a pencil. Secure the lid to the board with wood screws (make sure it is placed right into the centre!).

STEP 3:  Insert a 3.2-foot long plumbing pipe onto the lid and secure it with hot glue. You can also cut a longer one into a 3.2 feet piece.

STEP 4: Fill ⅓ of the pipe with stones, concrete or cement to keep the scratcher stable.

STEP 5: Connect one of the single tees (pipe connector) with one of the 90° elbow pipes.

STEP 6: Connect the structure you put together in step 5 to the pipe. Repeat step 5 and 6 to achieve the cactus look.

STEP 7: Cut 2 polystyrene baubles in half and glue one half to each of the ends including the 2 arms and the top in order to achieve the rounded look.

STEP 8: This is optional, but you can spray paint the cactus in green to prevent the grey color showing through the rope. This is just an extra measure you can take, but if you glue the rope very tightly around the pipe, the tube won’t show through it either way.

STEP 9: Dye at least 160 ft. of your sisal rope green with pet safe textile dye (but leave some plain for the board). You can find instructions for this on the dye’s packaging. As an extra tip, secure the ends of the rope that you cut as it unfolds easily. Also, leave enough time for the rope to soak up the liquids. Don’t forget to use gloves!

STEP 10: Start glue gunning the green rope to the pipe from the base to the first junction. 

STEP 11: At the junctions, use smaller pieces of rope and glue them on separately. Make them a little bit longer so you can cover the ends with glue and rope in the next step.

STEP 12: Continue wrapping the rope around the elbow, but make sure you cover the ends that you left sticking out at the previous step in order to prevent them from unfolding. Repeat step 11 and 12 at the next junction, and finish the top by wrapping the rope around.

STEP 13: Cover the wood board with natural sisal rope by glue gunning it.

STEP 14: For a nice finishing touch, add some fake flowers or felt pom-poms to the tops of the cactus, but make sure to secure them well.

STEP 15: Voila, you’re done! Now you and your cat can enjoy this adorable and very claw-friendly scratcher while redirecting his attention away from your sofa.

Want more DIY projects to work on at home? Check out our zero waste bag tutorials that you can make with old or left-over fabric here:

SEND ME MY TUTORIALS!

How to get the feeling of a new home every season

If you’ve changed things up with your home decor in the last few years, you may remember the thrilling feeling that crept up as you were nearly done. The last books on the shelves have been aligned as you step back to take in the brand new and unfamiliar territory. Much as if a new life was laid out in front of you.

But after a couple of months, you feel the magic slowly disappearing. The chair is now covered with clothes you pile on after coming home from work, sometimes the mess even extends to the living and dining areas. Your living space now bores the life out of you.

The desire to fall in love with your home grows once again.

Good news is that there simple ways to give your living space a completely new feel and it never has to be too extensive nor expensive. Having moved to a few different places in Melbourne, we thought we’d share some of our tips on the fastest way to make this happen. Starting with:

Removing Clutter

Both big and small home transformations require some degree of change to the existing layout. Wherever possible, you’ll want to clear the way for whatever’s to come.

Though it may seem obvious, removing clutter is the indisputable first step in any home pick-up. Not only will it open new possibilities for furniture and furnishing configurations, but will also leave the living room clean anyway if your burst of decorative passion suddenly disappears and you decide to hold off for now.

Similar to spring cleaning, you may find your ‘new home’ simply by getting rid of the extra objects that invaded your space, so that the rooms would get back their fresh, neat look.

As difficult as it might be to part with your old perfume bottles, you’ll want to dispose of them Marie Kondo style. The point is to have only the stuff you need, just like you used to when you first moved in. Looking for the dustiest pieces is an easy way to identify the objects you barely use and toss them out.

Rearranging the Main Furniture

Moving the key pieces of furniture such as the bed or sofa is the second thing you should try when re-imagining your living room. It might not seem like a big deal, but finding a new configuration for the big pieces of furniture opens up endless possibilities to restructure the existing furnishings scattered around. You may even bring in new objects to fill out the once cluttered space.

Or… go full on minimalist style and embrace the negative space in your house. It can be pretty artistically pleasing :)

Whichever you choose, get someone to help you move things around and turn it into a Saturday activity. You don’t have to envision the final design beforehand – let your creativity flow and get inspired along the way!

A simple rearrangement idea could be to turn two armchairs you rarely sit on into theater room chairs, by just placing them to face the television. Prop a small table against the wall, and your laptop on it — voila, a mini home-theater. So whenever you want to make a movie night or watch YouTube videos with your friends, simply take a seat and enjoy your own two-person cinema. Snuggle up with your loved one by combining the chairs, get some blankets and hot chocolate and you’ll be assured of a super cozy evening.

Utilize That Wall Space

Walls are the biggest blank canvas in most homes. Use them! Fill in those walls with framed pictures of your photos on Instagram, a DIY jewelry hanger or simple paper cut art.

Best part about wall decorating is that none of it is expensive or permanent by any means. The idea is simply to create some visual interest in an otherwise overlooked area of the home.

Introduce New Colors

Pictured: Clawproof velvet sofa covers on Nockeby sofa and Stocksund armchair. Source: Kate’s Victorian home

Whether they’re bedsheets or sofa covers, having a couple of interchangeable sets is the fastest way to transform up the color palette of any given room.  It makes sense to start here as they are the biggest and most used pieces of furniture in any house – everyone has one.

You can try warmer colors for the winter time to make the space feel more comfy, and lighter neutral colors for the hot days. Buying a new sofa altogether might be too costly, but choosing the right cover for your couch can make it look like you just bought it from the store.

The second biggest way to introduce color into the home is by using rugs. Big, noticeable and color coordinated ones that match your space are the kind should be looking for.

Here’s a live demo of this in action, straight from the homes of our friends across the globe:

Check out Hayley from mumlittleloves set the color scheme for her room. From the slipcovers, the rug, to even the window frames are so masterfully matched!

Or for a less bold option, consider Magdalena’s approach to designing a simplistic but stylish room with black and white elements. Once again, notice how the rug forms a crucial piece of this intricate puzzle.

Bringing In The Outdoors, Indoors

After moving all that furniture around and tidying up, you might find that there’s a lot more space to work with than you might’ve considered. Here’s your chance to bring in some new elements to fill the space.

When it comes to choosing decorations, you can never go wrong with bringing in a plant or two – it’s the classic. Other than being readily available and oh so affordable, plants are some of the best ways of adding some spirit into any drab environment. Humans do appreciate nature in their surroundings after all – science has proven this.

It doesn’t have to be excessive, just a small palm tree will make the room feel more alive. A Ponytail Palm can be a good option if you’re a workaholic that forgets to water the plants. You only have to place it in good light and water it whenever the soil starts dry-cracking.

Conclusion

Giving your home a noticeable makeover doesn’t have to be difficult, nor will you have to pick up the phone and dial the contractors. Working with the biggest elements in the room and then adding a few spicy decorative elements is all it takes to hit the refresh button on your home – and we’re all for it!

After all, home should be your favorite place in the world. Until you can afford to change houses whenever you get bored, you’ll just have to keep things interesting in the house you already have.

The best part? Looking for ways to re-create your rooms is also a great way to spur creativity, pick and a new skill and make your friends green with envy ;)


Want to give your living room a bold new look? Start with the couch! Give us a visit on our main website and discover the brands and sofa models we make customizable, bespoke slipcovers for:

REDISCOVER YOUR SOFA


Image Sources:

Minimalist Living Space – http://www.momtoob.com/
Mini Home Theater – http://cdlapa.com/home-theater-design-concept/
Slipcovers and rugs
https://www.instagram.com/p/CA4i7peHC1x/
http://mumlittleloves.com.au/a-sofa-slipcover-review-with-my-friends-at-comfort-works/
https://feinundfabelhaft.de/grosse-liebe-unser-weisses-sofa/
Plant Decor – http://www.stupic.com/

6 simple home upgrades that will increase the value of your property dramatically

Your house might be feeling worse for wear nowadays, but maybe you feel like it could be better and can be improved in ways that may not be clear at first.

You know that your home needs some reworking, but you’re not sure what to do or where to start.

The good news is that we’ve done the homework for you and come up with our own list of top home improvements that are simple to do yet deliver when it comes to increasing the value of your home — a bonus if you’re thinking of selling it at some point.

To start with…

1.Consider hardwood flooring

Adam Śmigielski on Unsplash

Hardwood stands over the top of the lists of many homeowners looking for new flooring, and for good reason. 

For starters, they are quite easy to clean while also being minimal maintenance. Compare it to carpets, where many an accidental coffee or milk spill has likely ruined the texture while also giving it a nasty stench in the process.

Gross! Now you have to throw it in the washer too!

Spills on hardwood floors, on the other hand, are much easier to clean by mopping or sweeping, as spills do not get absorbed and instead stay up on top of the floor.

On the aesthetic side, hardwood floors are just beautiful, and can instantly boost a room just by virtue of being there, as it gives the room a nice natural air inside. Plus, they are non-allergenic.

An important point that you should consider is how flexible hardwood is.

You likely don’t have to replace the entire floor if you want to refinish your wood in a different color. It is also much easier to repair.

The initial costs of purchasing hardwood might seem quite steep, but it is a well-worth investment, especially when you consider just how easy it is to install as well as how long-lasting it is when properly maintained.

2.Use different window furnishings

Orlova Maria on Unsplash

You would think that windows are not that big of a deal and should be ignored, but not quite.

When decorating, it is easy enough to focus on the obvious bits, like slipcovered sofas and paintings, but the more subtle and nuanced parts of the room like our windows tend not get too much attention.

This is a mistake.

Your windows provide support and contrast to the room’s atmosphere and should also be given the focus it deserves. 

From curtains to window shutters and roller blinds, each furnishing has its role in enhancing a room.

Let us examine some of them:

Curtains

Being the most flexible furnishing among the three, curtains stand the test of time in being a wonderful decoration that enhances a room.

Heavy material or light, blue or red, the choice is yours.

You have the advantage of going for made to measure curtains that can be tailored specifically to you and your room’s needs.

Window shutters

While not having as much flexibility in terms of design in comparison to curtains, one cannot overlook the aesthetic as well as the practical usage of shutters.

They are wonderful in regulating the light that enters as well as being great insulators. Not only that, they are much easier to clean than curtains, which have to be washed.

In terms of aesthetics, you can still find a lot of options, such as the wide range of styles and designs (classic, panel and plantation) that will suit your style and the room you are going for.

Roller blinds

Roller blinds are ideal for the modern minimalist-inclined person.

But in comparison to curtains and shutters, there are even fewer designs to choose from when it comes to roller blinds.

However, for most of us, this lack of options won’t matter since their simplicity in design and ease of use makes it prime choice for those going for a more minimalist and simple style.

3.Landscape your garden

Gus Ruballo on Unsplash

The outside of your house matters just as much as the inside.

It’s what guests will see before they even enter your doorway, so of course, you want to keep it as presentable as possible.

You can go about it in different ways.

For instance, if you’re into gardening, then you can create an elaborate garden that is sure to wow your guests.

But if you don’t plan to stay where you are permanently, keep it low maintenance to keep it as tidy as possible. Consider placing plants or urns on either side of a curve to “show” your guests where the entrance is.

Basically, you want to emphasize the entryway to make it appear grander. It is your home, after all.

You should also consider the color of your house when you design.

It is just as important on the outside for your guests to understand what kind of design you want your house to highlight.

Is it a comfortable blue? How do you want the plants and flowers outside to look in comparison? Maybe sprinkle some red and orange flowers, or keep the blue theme?

You can also consider repainting your house’s exterior if you have the funds to do so to make it more in line on what you want the outside of your house to look.

It is also important to think about the seasons. Will your designs last through all seasons, or only one? Shrubs and trees get a fresh look every season, giving design benefits that change as seasons come and go.

4.Refresh your driveway

Not every part of your house needs a rigorous redesigning to make it feel homely. Take for instance, your driveway. How does it look? Does it look as wonderful as it did on day one? Maybe it has some cracks here and there?

Getting parts of it repaired while also having professional pressure washing clean the road should make it feel brand spanking new. 

Remember, all parts of your house count toward a nice environment, so do not sleep on what seems to be unnoticeable at first glance!

5.Make your home ‘smarter’

BENCE BOROS on Unsplash

This is something our ancestors could only dream of having.

We are in the digital age, which means that we have access to a lot of advanced technology, and we should really be taking advantage of that.

Have lights around your house or porch turn on at pre-set times. Have your sprinkler system ready to go without you having to be around to flip the switch yourself. 

Not only do you not have to worry about doing these things yourself, it is always a dazzling sight to see things turn on automatically without needing the help of a human.

It’s like magic, except not really. It’s science!

6.Transform your basement into a living area

Having a storage room is nice, it functions as, well, storage for all those extra goodies you have around!

But take a step back and actually examine it. Is this really meant to be the fate of what could be another great room?

It is not something that needs to be drastically changed instantly, especially if you have a lot of items dumped in there. It’s just that maybe you could consider doing something about those hanging cobwebs.

Considering how people are looking for more rooms that they can use around their homes, investing in fixing up your basement, broken chairs, reupholstering your old sofas that would otherwise sit around collecting dust if you can is a wonderful idea. 

While it likely won’t have the nice windows and ventilation that other rooms have, you can still turn it into a perfectly serviceable living room space without having to undergo major renovations. 

Some deep cleaning and changing of materials such as flooring and painting the walls will do, while adding some nice furniture like couches and even some indoor plants to give the room a more natural feel will turn it into another nice relaxing hangout spot.

As you can see, there are so many ways you can fix up your home to make it a brighter place than before. Some of them are grand, such as complete room revisions, while other are more subtle and nuanced, such as making your driveway look new.

The important thing to remember here is that when making your house better; don’t just consider the main part of it — consider every inch, every nook and cranny that you can find, because they are also part of what makes the room the way it is.

Yorkshire Fabric Shop is an upholstery and furnishing fabric supplier that’s based in the heart of the United Kingdom where we serve customers from all over the world. We offer upholstery fabrics for sofas, chairs, cushions, curtains, beds and whatever else you can imagine.

Feature photo: Brian Babb/Unsplash

Sofa struggles? We've got you covered.

From pet mishaps to everyday spills, our sofa covers tackle life's little messes effortlessly.

Find the perfect sofa cover
Stuck with a stained sofa?

Stuck with a stained sofa?

Spills happen, but they don't have to stay. Our stain-resistant, machine-washable slipcovers make cleanup effortless.

Find a cover
Need an outdoor-friendly couch cover?

Need an outdoor-friendly couch cover?

Sun, rain, and spills are no match for our UV-protected sofa covers, designed to handle the elements in style.

Upgrade my sofa
Pets love your sofa a little too much?

Pets love your sofa a little too much?

Claws, fur, and accidents won't ruin your space. Our pet-friendly sofa covers are tough, stylish, and easy to clean.

Protect it now
Moving in, but your sofa doesn't fit the space?

Moving in, but your sofa doesn't fit the space?

Update your sofa to match your new home with a sofa cover that changes the style without replacing the frame.

Revive your sofa