You’ve probably heard the word ‘composting’ being thrown around a lot these days, and for good reason: Us humans are producing way more trash than we should be.
And we’re producing it at an eerily high cost — that of a polluted, unlivable planet.
If you’re unfamiliar with the composting process or are just wondering how you can make it work in your home, here’s what you need to know and consider:
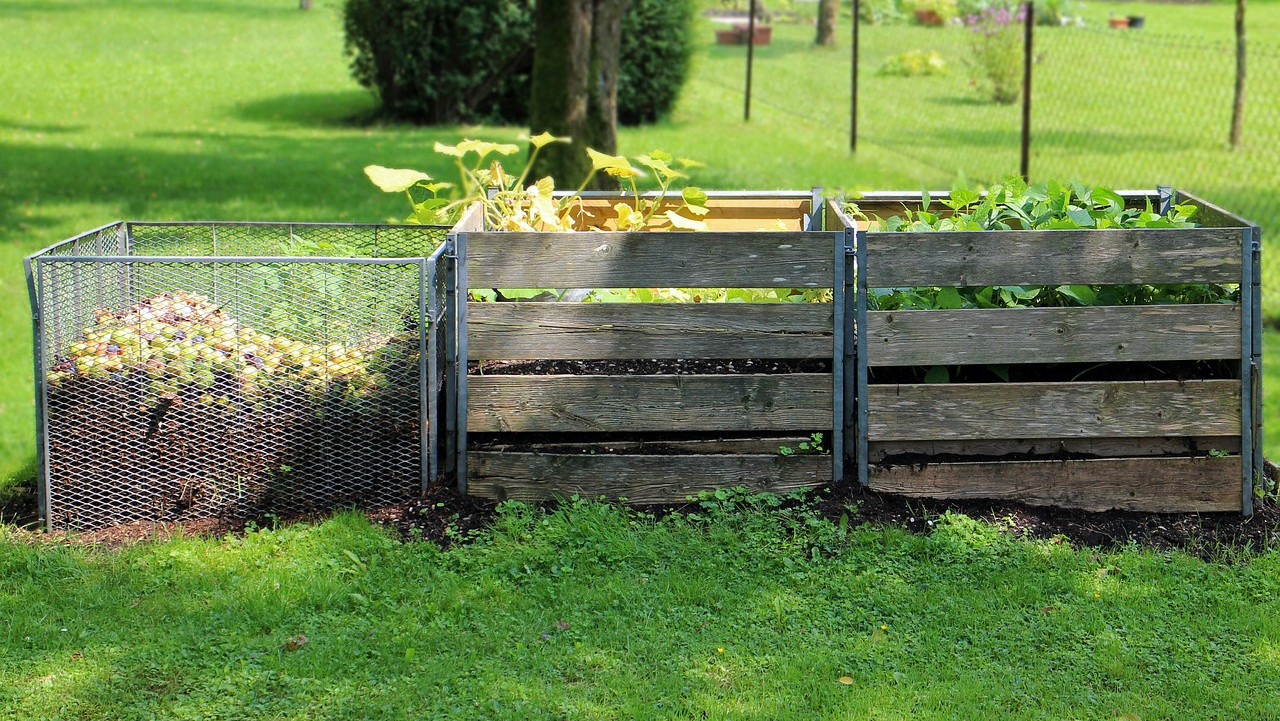
What’s composting?
Image by Denis MOREAU from Pixabay
To put it simply, the act of ‘composting’ is pooling together organic matter like plants and letting them break down into organic matter.
This way, items that would have been considered waste are broken down to produce a nutrient-rich soil conditioner, otherwise also known as ‘compost’, which in turn, can be used as a fertilizer for plants.
If you’re looking for a simple way to give back to the earth without letting your your food scraps go to waste, composting is the way to go.
Who is composting for?
Honestly, everybody who eats and have food scraps can easily compost, and that means all of us.
Composting is a much better alternative to just dumping your wet garbage to go to the landfills, and you’ll be throwing out a lot less trash too.
If you live in a home with a backyard, composting your scraps and leaves would be a great way to help your plants grow and stay healthy. Don’t have a backyard? No problem, even an apartment balcony can house a cozy plant corner and compost heap to keep your greens happy.
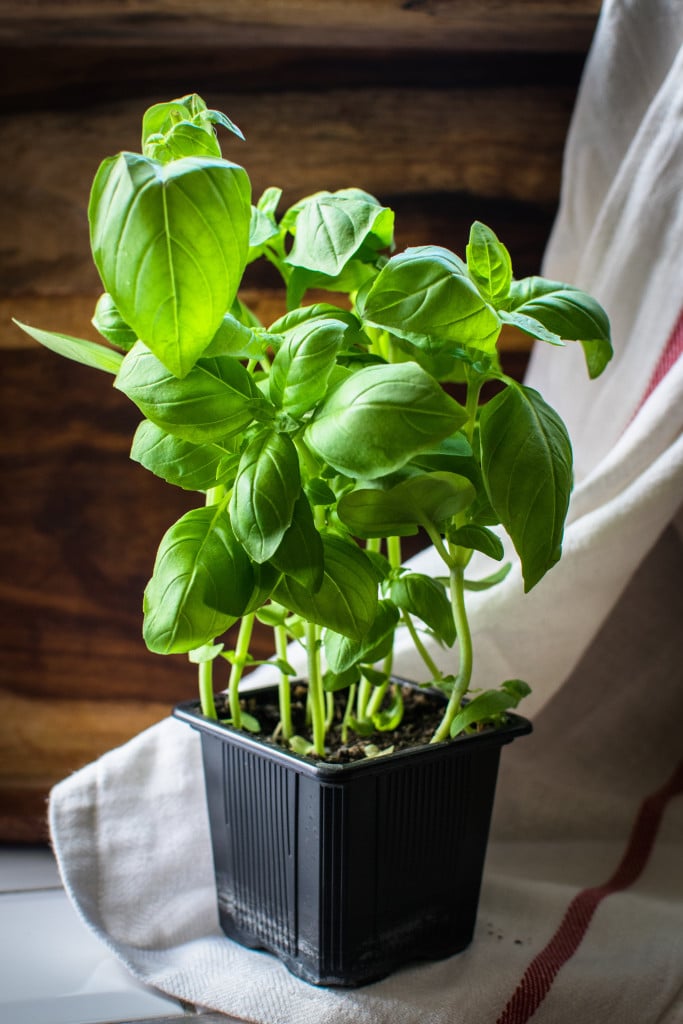
How to start composting?
Image by Iva Balk from Pixabay
For those who have the space, an outdoor tumbling composter from FCMP Outdoor will be the perfect tool to help you make your own compost.
As the name may suggest, the tumbling function of this composter helps you mix your compost pile without you having to dirty your hands. All you have to do is to close the door and turn it 5-6 times every 2-3 days.
And with the right weather conditions, the compost can be ready in 2 to 3 weeks.
For those who require a smaller, indoor version, this composting tumbler bin from Envirocycle does the job easily.
You can place it on the balcony, turn it 3 times every 3 days to aerate and mix the pile, then add the compost where its needed.
Be sure to also get a composting bin for additional scraps, since you won’t be able to add anymore until the first pile of scraps has fully composted.
How does composting work?
Once in the bin, microorganisms in the composting materials start breaking down your scrap materials down.
Your compost heap needs to be mixed so that the microorganisms get enough oxygen to break things down, but not too much, though or you’ll risk disrupting the composting process that happens in stages.
Not all items will compost at the same rate — it can typically take weeks for your compost heap to fully compost, which is why you’ll need a separate bin to store the new food scraps you’ll inevitably collect.
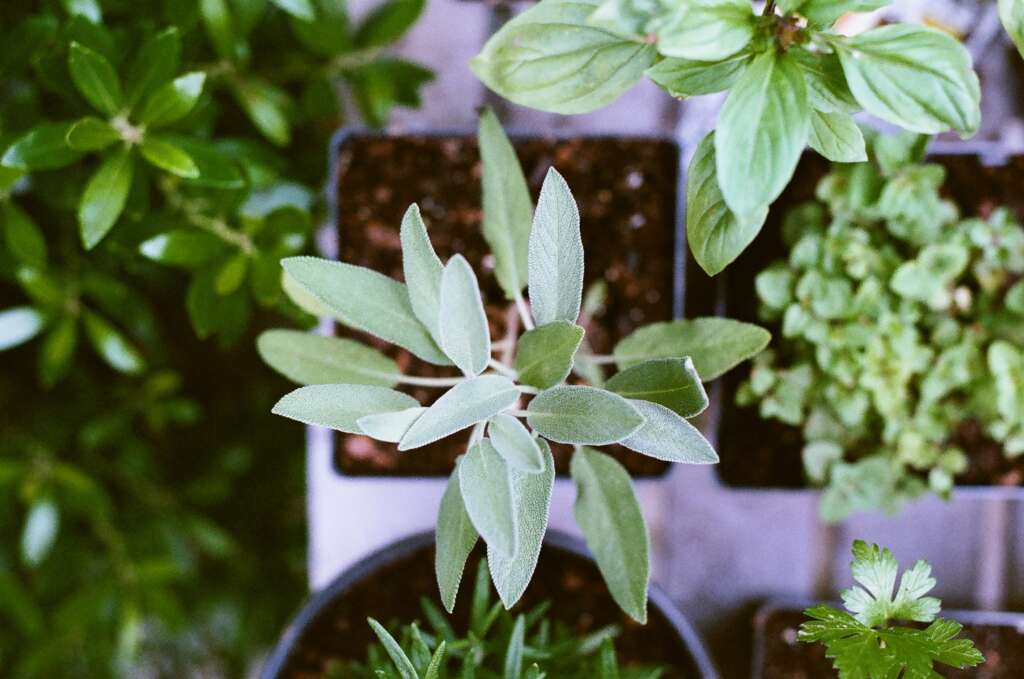
What can be composted?
Image by Ben Kerckx from Pixabay
Most organic matter can be composted — items like crushed eggshells, vegetable scraps, onion skin and carrot peels can be added to the compost bin.
What’s not recommended: Processed food items like dairy and potato chips, and animal-sourced ones like meat, nuggets or even lard.
When shopping around for a composter, consider getting one that will trap odours and have ‘guards’ in place to prevent pests like cockroaches and bugs from getting into your compost heap.
Overall, composting is fairly simple process and doesn’t require specialist expertise to get done. In fact, once you start, you’ll likely marvel at how much less trash you’re throw out.
And did we mention how much happier your plants will be?
Thinking of making your home more environmentally- friendly?
Start by trading your plastic shopping bags with reusable ones that are made from fabric scraps that you may have kept around the house, and swapping your paper napkins for washable, fabric ones. You can make them yourself with our FREE, easy-to-follow tutorials:
Any pet parent will tell you that owning a puppy can be almost as much work as having a baby.
In fact, having a new puppy requires just as much attention and care as its human counterpart.
But don’t get us wrong. Despite the time-consuming effort it takes, having a puppy is so rewarding in the long run. You have human’s best friend doting on you every second, and there’s nothing better than coming home to a furry friend wagging its tail and wriggling its body happily.
Your life will change, and only for the better. But first, you’ll need to be prepared to commit.
So before you go on and adopt a new puppy, here’s what to expect in the first month of your new, beautiful life together.
Aim to take your new pup to the vet within 48 hours of bringing it home.
This is crucial in order to determine that it’s in good health, and also to get your pup its first round of vaccinations. Your vet will likely start off by giving your new puppy a physical examination and let you know if you should be looking out for anything amiss.
Going to the vet is also a good opportunity for your new pup to meet new people and begin socialising.
Forget you ever owned nice shoes
Image credit: Pexels/ Caio Resende
Fact: Puppies love to play.
On days where you have plenty of time to tire your pup out with lots of playtime, great. But not so on days where you’re too tired after a long day at work.
If you tend to leave your shoes out in the open, perhaps it’s time to resign to the fact that your shoes will soon end up as chew toys.
But it’s not just shoes that your new puppy will go after — it’s likely to be most things within sight, so be sure to puppy-proof your home (if it’s an indoor dog) by keeping all chewable items that can be swallowed, out of sight.
Hide all electric cables and cordon off any rooms where you wouldn’t want your pup to go potty in.
It sounds time-consuming, but hand-feeding your puppy in its first week home is a great way to bond with it. This is also a great way to kick start the training process and teach it simple tricks such as how to sit and stay.
Hand-feeding is also a good opportunity to teach them to have a soft bite – so they don’t lunge forward and accidentally bite your hand for a treat the next time, and discourage eating their food too quickly.
Don’t unintentionally reward unwanted behaviour by feeding it when your pup jumps or barks. Doing so will only reinforce the behaviour you don’t want, when it gets hungry.
Also be sure to set regular meal times instead of making food available all day, so your new pup doesn’t become overweight.
Socialising is a must
Image credit: Pexels/ Michael Morse
Your puppy’s first 16 weeks are its most formative period, so everything it experiences during this time will likely stick with it throughout its life.
This means that it’s important you spend as much time as possible creating plenty of positive experiences with it.
One of these experiences is socialising your puppy, whether it’s with other animals or human beings, and making sure that these experiences are happy, friendly, and positive so your puppy will grow up to be a friendly, well-adjusted dog.
Because your puppy’s first 16 weeks will determine it’s future character and temperament, it’s also the perfect time to incorporate training into this period.
Obviously you’re not training a police dog, so there’s no need to take on a rigid, military approach — the goal for most pet owners is to make the process a fun experience with a good mix of training and playing so your pup enjoys it too.
Start with simple tricks such as sit, stay, down, roll over, high five, giving the paw, and more.
You can gradually fold more serious commands such as “drop it” or “give”, into the plan to make their assimilation into your household a lot easier.
Like babies, your puppy won’t be able to control its bladder very well — just a burst of excitement can trigger an ‘accident’.
The good news is that potty training is a relatively straightforward process, although it’ll take time and plenty of patience.
When starting out, always start by bringing your new puppy out for a potty run first thing in the morning and the last thing before bed. In between, aim bring it out for a potty break after playtimes and after meals.
If you have a garden where your pup can go for its potty breaks, try designating one specific area where it can do the deed, and bring it there every single time.
If you’re not going to be home for most of the day, be sure to confine it to one area of the house with a playpen, and put its bed in one corner, with pee pads in another corner.
Puppy accidents are to be expected, so it helps to be prepared for them so you can spend more time enjoying your time with your new pup rather than worrying about avoiding and cleaning up messes.
Want to make your home more puppy-friendly? Start with your sofa by giving it a removable, machine-washable sofa slipcover that’ll make your sofa less of a hassle to keep clean. Take our sofa slipcover fabrics for a test run here:
And because more people than ever are looking to move into smaller living spaces, having an outdoors garden might even seem laughable, hence the growing popularity of indoor plants.
If you’re exploring your options, did you know that you’re not confined to just succulents and cacti? In fact, it may be time to expand your plant parenting horizons and go for indoor herbs instead.
Worried that your thumbs aren’t green enough (we know what that’s like!)? Put your fears to rest by diving into the rest of this post, where we’ve compiled the easiest herbs that anyone can easily grow indoors.
Chives
https://www.instagram.com/p/BzVxH0HBeuF/
Chives are a great choice for an indoor herb garden, especially if you have a sunny spot where they can get plenty of sunlight.
They’ll need six to eight hours of sunlight per day, so if a sunlit spot isn’t an option, place it under fluorescent lighting instead. Chives also love moisture, so be sure to keep other plants nearby.
To keep it happy and healthy, water your chive plant when the top part of its soil feels dry to the touch and trim the leaves regularly at the base, but be careful not snip off more than a third of the bunch at a time.
Love your drinks with a hint of fresh mint? You’ll appreciate having your very own mint plant on hand, at home.
Pro tip: Growing it indoors in a pot (as opposed to the outdoors) will keep it from spreading all over the garden.
When planting mint indoors, select a pot with a wide surface instead of a narrow and deep one, so that the plant’s root don’t encircle each other and end up choking the plant.
Make sure it gets plenty of sunlight by placing it in a bright, sunny area of your home, and water daily to keep the soil moist but not wet.
If you often make Italian dishes at home, you’ll know how often you need fresh basil in your cooking.
Growing them at home will not only save you some extra dollars from buying them at the supermarket, they’ll also be easily within reach whenever you need a handful for pasta, pizza or salad.
Luckily, they’re pretty easy to grow indoors too.
Be sure to plant them in well-drained, nutrient-rich soil. They shouldn’t be watered too often, which is why soil drainage is important.
Place them in a sunny spot — basil needs at least six hours of sunlight a day. When harvesting, snip off the leaves rather than the whole stem so that they can grow out again in a few weeks.
You might be familiar with the bay leaf herb, but as plants, they’re known as bay laurel.
Plant this in well-drained soil and place it in an area that has full sunlight with a good level of humidity.
Thyme
https://www.instagram.com/p/B09SEexgTMy/
Thyme is one of the easiest plants to cultivate, especially if you’re starting out with a cutting.
Its roots typically don’t appreciate soggy soil, so be sure to plant it in well-drained soil and a pot with a large drainage outlet. Thyme doesn’t need direct sunlight, so you can pretty much place it anywhere that has indirect sunlight.
Water the plant when its soil becomes dry to the touch.
And because thyme grows pretty quickly, be sure to trim it often to stop it from overgrowing.
Lemongrass
https://www.instagram.com/p/ByXK4bnlMff/
Most lemongrass plants you see are grown outdoors, but they can also be grown indoors.
Its natural scent helps repel insects, and they’re a great addition to Asian-style cooking. The best part is, they’re easy to propagate from the stalks you purchase at the supermarket.
Planting them indoors is also ideal if you live in an area with a colder climate, as they benefit from the warmth. Lemongrass plants tend to grow as large as the containers they’re placed in, so pick one that will work with the space you have and place your pot under full sunlight and water daily.
Pro tip: Harvest the bulbs often to encourage new growth.
Rosemary plants are pretty easy to grow if you have a space that gets plenty of direct sunlight — at least six to eight hours daily.
Pair it with well-drained soil, and you’ll have a 24/7 supply of soothing, aromatic rosemary on hand. Be sure to water it when the top of its soil feels dry to the touch, and never let the soil dry out completely.
During winter, your rosemary plant will require a lot less water than summer season, so hold back on the watering during then.
Oregano
https://www.instagram.com/p/ByUZSFpFZbi/
Oregano plants love heat, so growing them in sunny spots with direct sunlight is ideal.
Naturally, this means that you’ll have to place them in a space where there’s a window (or more). Don’t water too often to allow its soil to dry out before watering again.
Whether you’re using it to ‘cleanse’ the energy in your home or add flavour to your cooking, growing sage indoors always comes with an upside.
These plants are the easiest to grow as they are hardy, flourish all year round, and are drought-tolerant.
Be careful not to overwater the plant and keep it in well-drained soil in a spot where there’s plenty of sunlight. To harvest, simply snip off at the base of each leaf.
Now that you know which indoor herbs grow best, it’s time to get going setting up your own edible garden at home.
Have fun!
Looking for more ways to live a zero waste lifestyle? Start by making your own reusable, fabric bento bags and napkins with our DIY tutorials:
But, here are some things to think about before diving into the list. Feel free to skip it if you’re not interested. You can read the strengths and weaknesses of these houses below.
What to consider:
Cat houses aren’t just wonderful devices that help you locate your cat.
They are safe-zones to retreat into and should be comfortable enough to stay in for a long time.
Of course, comfort is not the full story.
So what should we consider when choosing the perfect cat house?
Price:
Cat houses don’t have to cost a fortune to be effective.
They can range from $30 for basic, comfortable lodging that your cat will love to under $200 for heavy duty outdoor cat shelters with all the bells and whistles.
Size:
The houses don’t have to be big either.
It’s no secret that cats enjoy small spaces more than they should.
Remember, we’re talking about the kind of animals content living in a box. Confined spaces are warm, cozy and are perfect for drawing cats in.
That said, buying a cat house without considering its dimensions could be a mistake. Grab that measuring tape and your cat if it lets you to make sure it fits!
Aesthetics:
The perfect cat house wouldn’t be perfect if it sticks out like a sore thumb.
Think about where to place the cat house and how it will look before pulling the trigger.
Some houses (think cat condos) are also bigger than you may expect. Be sure to allocate enough space prior to the purchase.
Function:
Indoors or outdoors? Cat house or cat tree?
There are so many choices that serve different functions. Amusement, weather resistance, heating, insulation, safety and portability are all factors.
Think about what purpose you want the kitty house to serve to find the perfect cat house.
Maintenance:
You’ll need to clean your cat house too. Easy dismantling and machine washable bedding would help save time and effort.
Cat friendliness:
Everything about a product may seem great on paper. But just because we like it doesn’t mean the little fur ball will.
It’s best to go with choices that are proven to be loved by cats. These take into account a cat’s natural instincts.
Much like us, they look for comfort, sturdiness, shelter, warmth and most importantly, safety. That’s why they naturally perch themselves high up.
It’s also why many outdoor cat houses are built with two doors. One for escaping from potential predators like coyotes.
Got all that? Great!
With that in mind, here’s the list of best cat houses for any situation.
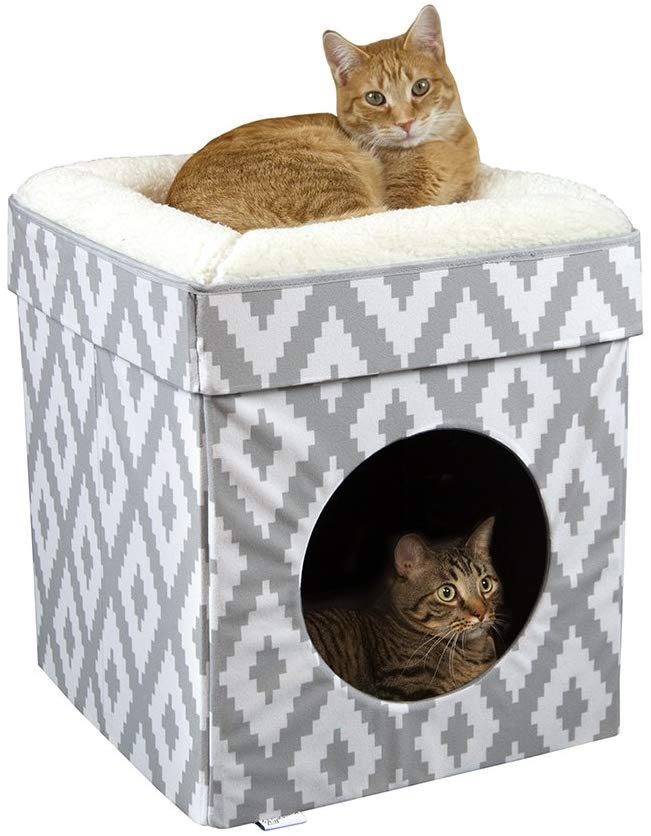
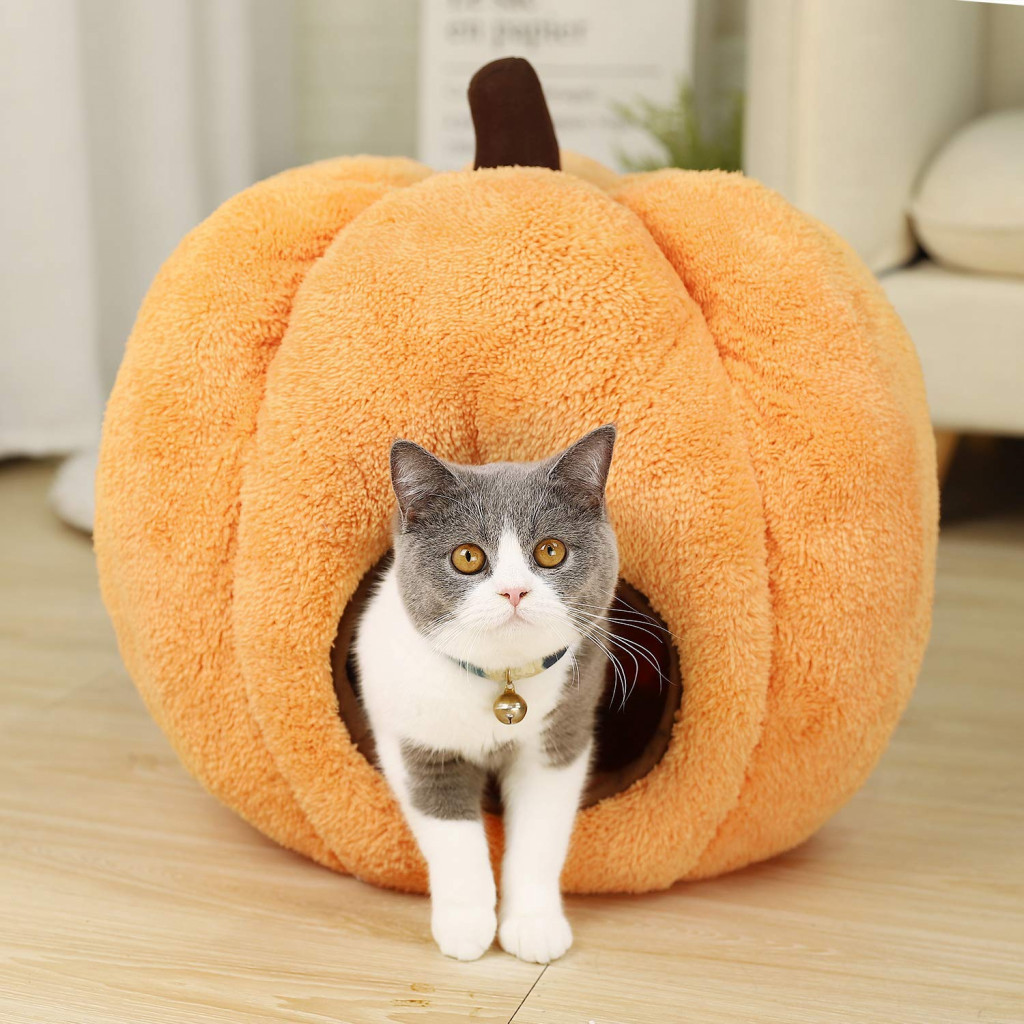
Simplicity is what you get with the Kitty City Cat Cube.
It’s reasonably priced ($31), easy to assemble and quite sturdy. This box is no pushover.
No literally, it’s not light enough for your cats to topple it. Cats on the chubbier side can lounge on this with no problem.
At the same time it’s not heavy enough to sacrifice convenience which is possibly the best feature of this cat house.
Able to be taken apart and moved in under 2 minutes with no tools, this box is portable.
Top that off with comfortable removable machine washable cushions make this box a hit for those seeking function over form.
But will it be a hit for your cat?
Most likely.
And that’s the best we can do with cats and cat houses. They do have their own preferences.
Chances are that it will be a hit. It’s a hit on Amazon with many cats taking to it.
Maybe it’s the box shape that trigger a cats instincts, but who’s complaining? The shape makes it a great space-saver, and comes in a sufficiently conspicuous color.
Accommodating up to two cats, throw in a blanket at the bottom to reduce the chances they will fight for the top spot (the one with the cushion).
The only gripe with this is that it smells until aired (which could take 1-2 weeks).
Other than that, it’s great.
You’ll be wondering why there’s a need for anything more.
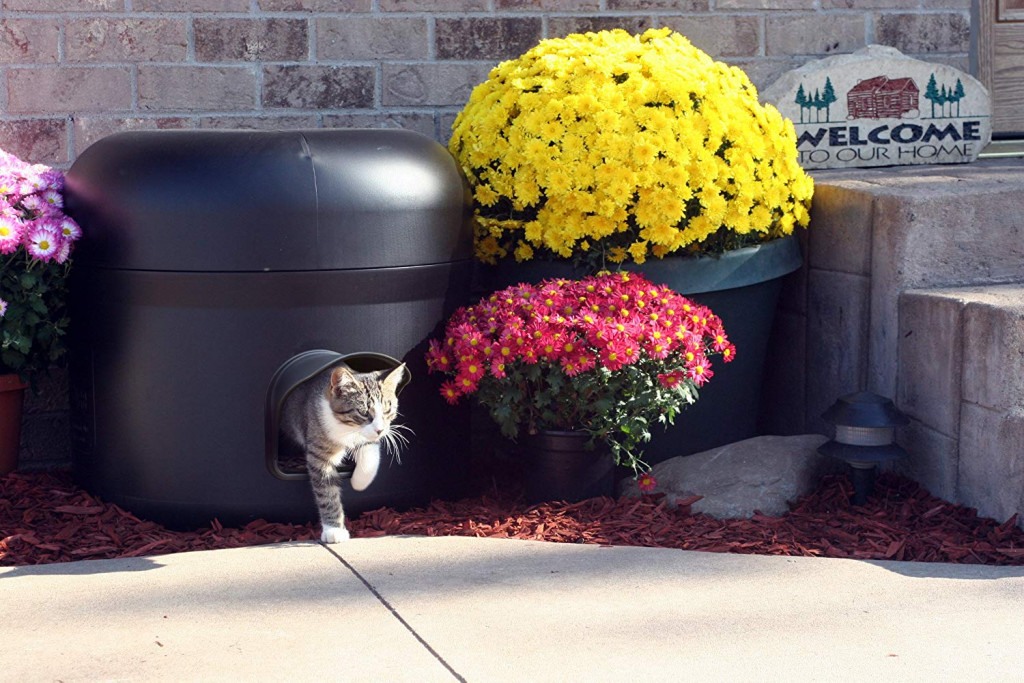
Need THE weatherproof solution for your little outdoor friends?
The Kitty Tube is the best there is.
This is the Ferrari of outdoor cat houses. The third generation igloo-looking plastic shelter has seen many improvements over the years.
It’s more or less perfect at what it does – sheltering against the elements.
You’ll know what it’s built for by just unboxing the thing.
It’s heavier than you might expect, but the hard element-proof plastic shell is guaranteed never to chip, crack or fade.
The insides are lined with insulated foam that’s moisture proof, mold proof, mildew proof and bacteria proof. Good thing it isn’t cat proof as well :)
Pair this with a heat retaining smallish enclosure (which still fits 2-3 grown cats) and you get the ultimate outdoor cat bunker.
If it ain’t freezing, you won’t even need the heating pad.
It’s also cool enough during the summer thanks to the strategically designed vents.
It’s been well-thought-out, right down to the maintenance aspect. The foam is pee proof and the lid can be taken off for easy-breezy cleaning.
Will it see use?
Most likely, people love it. But it’s an unfortunate waste if your cat is the shoebox type.
Being so good at what it does have some drawbacks.
The small design of the only entrance helps retain heat, but may make your cat feel cornered and unsafe.
This is despite the entrance bring too small for predators to enter.
So, you may want to leave the lid and entrance flaps off until they get used to it.
Otherwise, there are no real downsides besides the premium price. It’s the best when it comes to insulating your cat from mother nature itself.
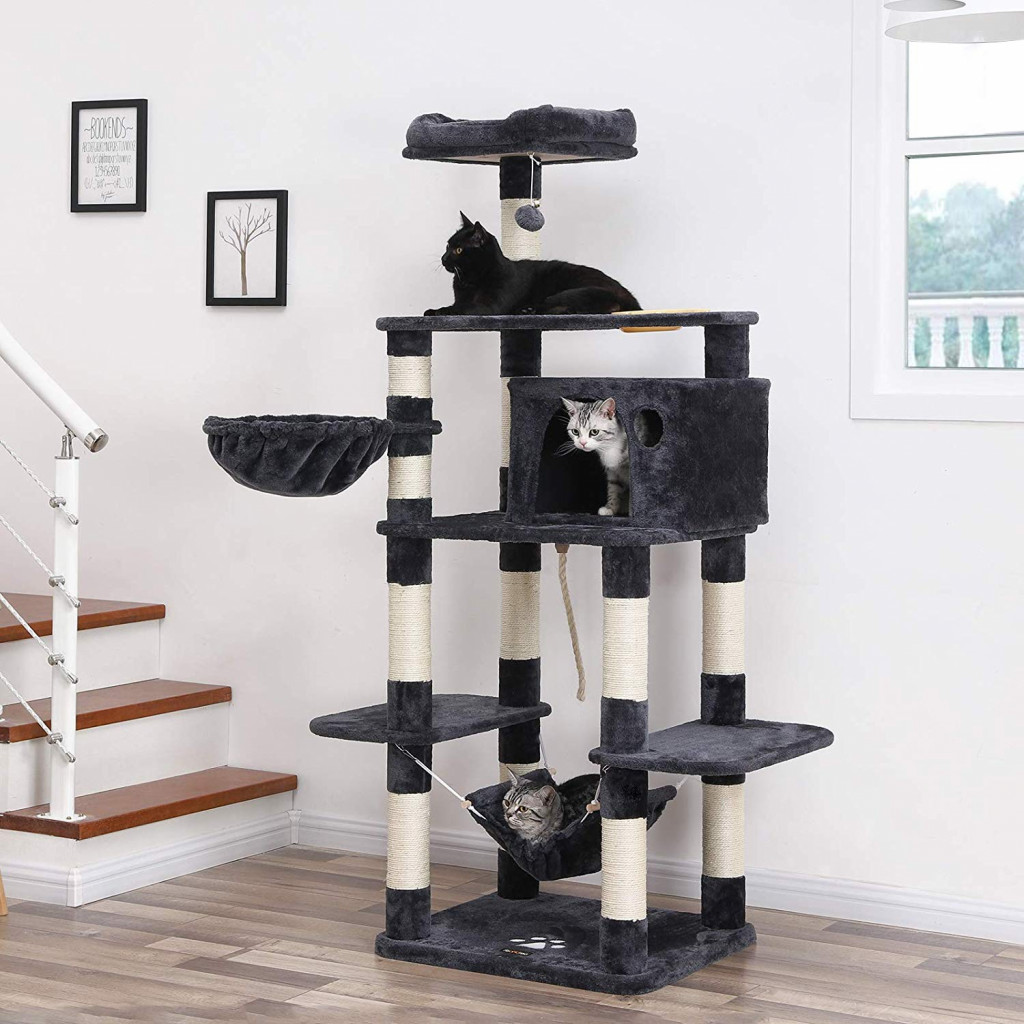
Best Cat Condo / Cat Tree: Feandrea Cat Tree
Image Credit: Amazon
The Feandrea cat condo is grand-looking and feature rich, like a luxury Airbnb. It’s all you need to give your fur babies a taste of the high life.
Towering at 68 inches (173cm) with soft plush fabric, it’s like opening a can of tuna with Hobbes around. No coaxing needed.
The Feandrea does require some assembly, as it comes with numerous parts that’ll take about an hour to set up.
Unless your cats mess with it before you’re done, which is pretty common.
It’s also on the heavier side which is excellent.
Why?
It’s sturdy as a rock and has a huge base that won’t budge.
It’s ideal for nimble nibblers and chonkers alike. That’s what you need in a cat tree.
You can trust that it won’t give way or topple over. More importantly, your cat can trust it which means it’ll see good use.
In fact, they’ll be sprinting up and down the numerous platforms.
The bonus is having a cat bowl placed near the top, keeping other pets from stealing food.
The towers are also lined with scratching pads. Hopefully, they’ll be enticing enough to stop your cats from tearing up your other furniture.
It’s also modular so you can get a couple to mix and match and create kitty city!
If you need something big with no space concerns aimed at full-grown cats, this is the cat condo you’ve been looking for.
And true to its description of “cat condo”, it works even better for those with many feline friends
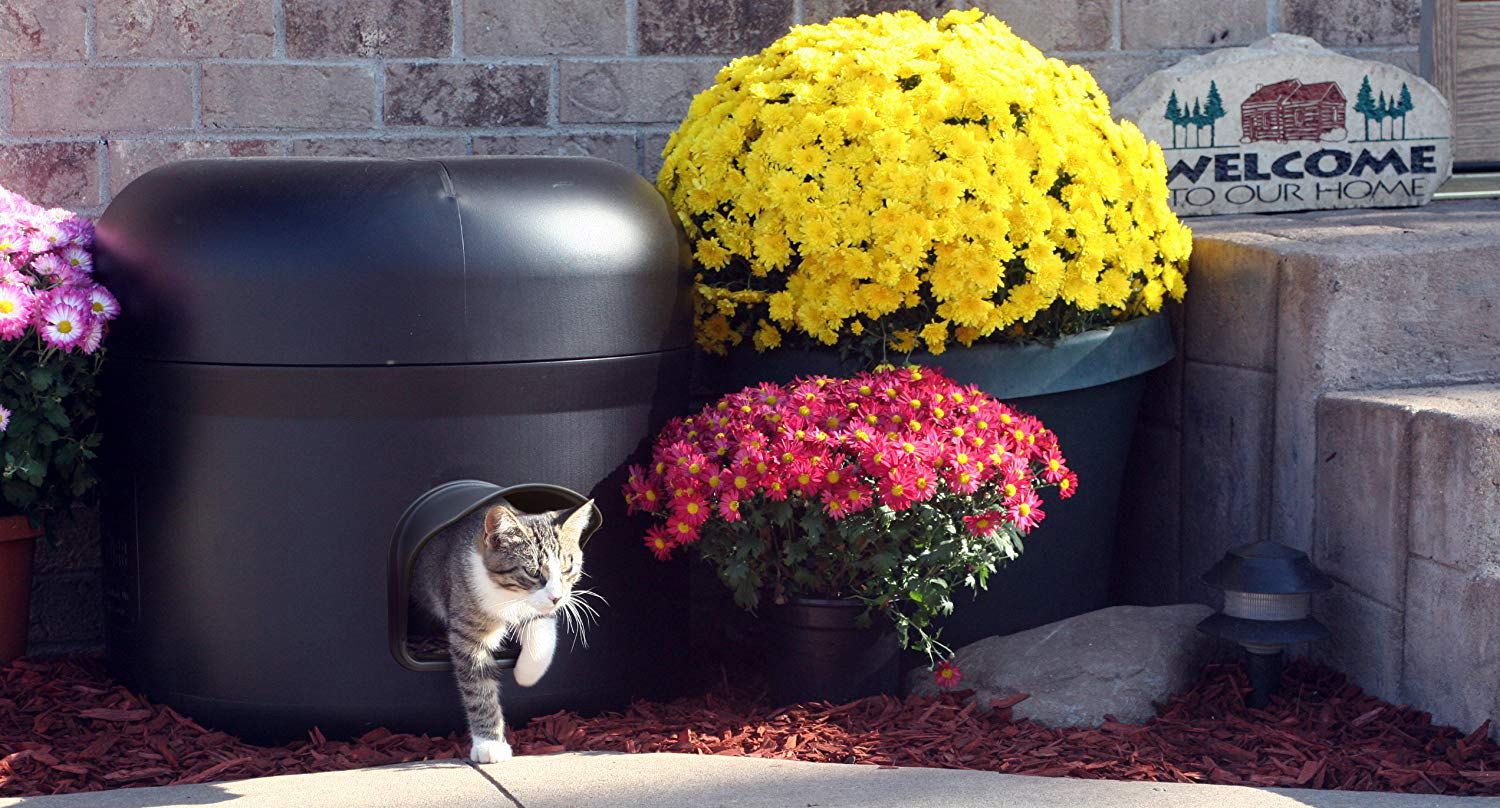
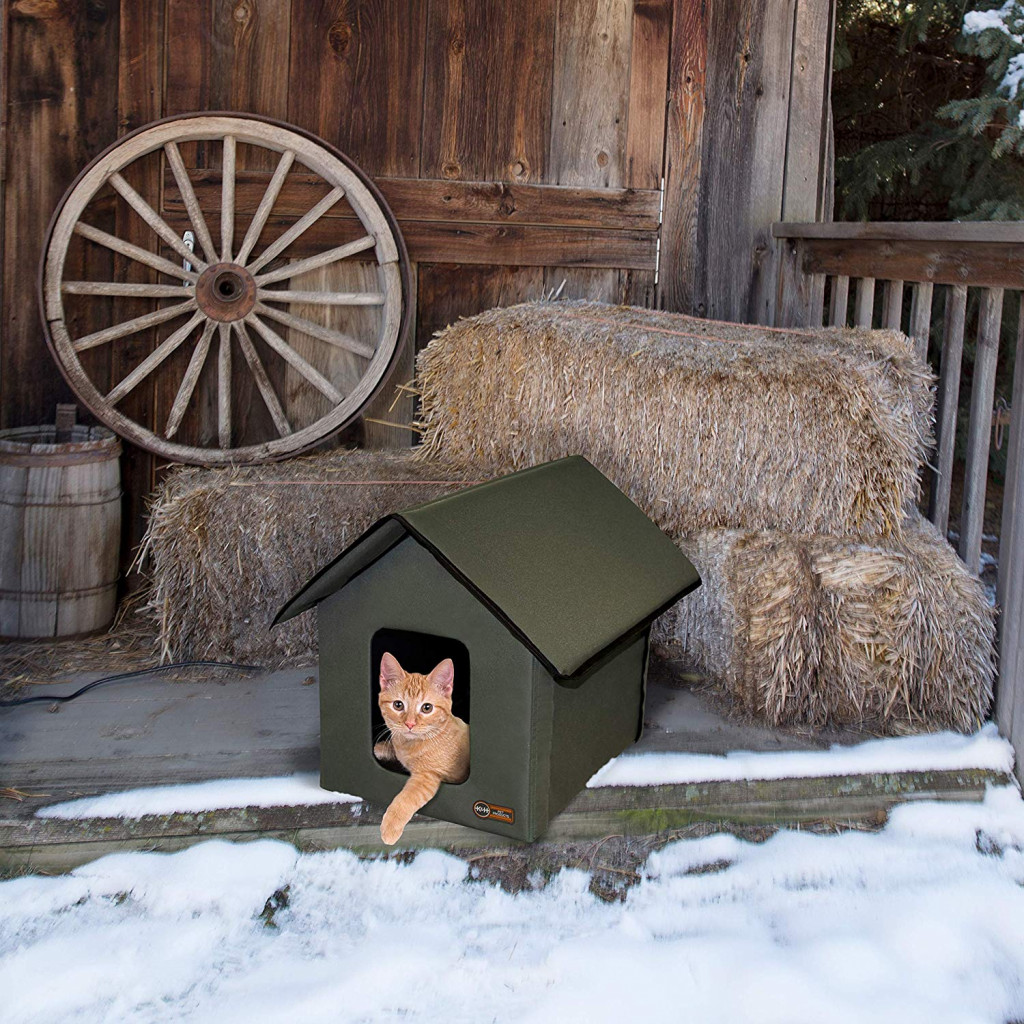
Best Heated Cat House : K&H Outdoor Kitty House
Image Credit: Amazon
Want to get adopted by your friendly neighbourhood feral? Look no further.
Tried and tested, the K&H Outdoor Kitty House is famous in the cat house world.
It is the most purchased and reviewed cat house on Amazon, likely to be an instant hit with cats.
Simplicity is its strong suite. It’s intuitive and can be setup in under 5 minutes.
It also looks like a cat house, which is adorably cute and adds points.
Function wise, it does everything it’s supposed to. Where it shines is outdoors, for feral and outdoor cats.
It’s designed for safety. With two exits, your cat could escape from potential predators.
This is important because if your cat doesn’t feel safe, she won’t use it.
That’s why they like to perch themselves high up which could be an idea to further increase the appeal of this cat house. Place it up high.
Additionally, the cat house is small and cosy with insulated material to fend off the cold. The velcro-able (yes, now a word) door flaps further help with this.
The heating pad is a bonus.
It’s designed to be irresistible, especially during the colder months, which is the best time to bring it out.
Just don’t be surprised if you find feral cats inhabiting it.
Would we recommend this to everyone?
No. There are a few reasons why a different heated cat house may be a better choice.
Firstly, the heating pad has a sensor will only activate if something reasonably heavy (roughly 10lbs/4.5kg) is placed on it.
It’s for fully grown cats and will take your cat some time to figure out as well. It won’t initially know that the little cottage is a little warm wonderland.
Although this is marketed as an outdoor cat house, it’s only weather-resistant. It’s not weather-proof.
Therefore, water soaks into the base of the house. Maybe pulling a trash bag over would help?
Therefore, this cat house is best used under a roof. I guess that’s to be expected since it needs to be near a socket.
If it weren’t for that it could be the best outdoor cat house for the price as well.
If you’re expecting, chances are you’ve been trawling the internet looking for some nursery ideas to get inspired.
After all, that’s why you’re here.
To save you the trouble, we’ve gone ahead and done our own trawling for amazing nursery decorating ideas, then narrowed down our favourite finds, which hopefully, will be yours too:
1. The Soft Rustic Nursery
https://www.instagram.com/p/B0ePIAjjNJI/
An all-white nursery doesn’t have to be boring — the goal is to give it that soft, soothing touch just like Marie Luciano of @blossominginteriors did with hers.
Just add fresh flowers and plush baby toys into the mix and they’ll instantly soften up the entire nursery.
This is one of those nursery ideas that also works perfectly if you have a farmhouse-themed home.
2. Dusty Pink Walls
https://www.instagram.com/p/B0ylFLCHShs/
For a baby girl’s nursery, the first idea for decoration is always, always pink.
The question is, which shade of pink? Alexa from Our New Walls painted her baby’s nursery a gorgeous shade of dusty pink that’s given it a vintage look.
The icing on the cake is definitely her gorgeous yet minimal cot mobile of clouds, stars, and moon.
3. A Bohemian Rendition
https://www.instagram.com/p/B00_Cdbj6NO/
Have a bohemian decor style at home?
Carry that style into your baby girl’s nursery by adapting the look from Cabu Creations.
The idea is simple: Throw on a printed, geometric rug on the floor, add wooden fittings, then adorn the walls with playful and whimsical art pieces for that subtle touch of bohemian chic.
4. A Unicorn World
https://www.instagram.com/p/Bz8jXthnm0k/
Create the perfect dreamy wonderland for your baby girl with a nursery that looks like it belongs in one, thanks to inspiration from this set up by Madelen’s.
She’s transformed her baby’s room with floral paper cutouts and star stickers on the walls, and a pretty pink bed canopy for a lush, luxurious look that makes you feel like you’re in another world.
5. Whimsical Touches
https://www.instagram.com/p/By-0u8RoYXa/
If you dreamed of having a room full of toys as a kid, this nursery style is for you.
To get started, take a design cue from Yvonne of @misstiptop, who’s created a flawlessly playful theme in her baby’s nursery.
We’re loving the streamers hanging from the ceiling, floating miniature hot air balloons, and cupboards full of toys (dreamy much?).
If you’ve got a minimalist, earth-inspired home, your baby girl’s nursery doesn’t have to look completely different from the rest of your space.
Do away with the frills and go with clean lines like this nursery design shared by @noblecarriage.
Here, beech-coloured wooden pieces serve as the room’s focus and are accented with other natural elements that complement them, like woven baskets.
7. The Boho Chic Baby
https://www.instagram.com/p/B0mbqKYAV0C/
When in doubt, keep it simple with a restricted colour palette as @danielle.donohue has done.
Her predominantly white nursery is peppered with little touches that don’t stray too far from the minimalist-based concept of the entire room.
Contrasting patterns and colours that pop, like a print rug, a potted plant, and touches of wood pull together the look of the room. Also, isn’t that rattan nursing chair just adorable?
8. A Tropical Paradise
https://www.instagram.com/p/BzDWIHEHXSN/
The best part about living in our modern times is that a baby girl’s nursery doesn’t necessarily need to be swathed in blush pink and unicorns.
@lust_life_designs broke out of the pink box with a tropical, safari-style nursery complete with gold print wallpapers, macrame lights and Aztec-print rug.
And we’re pretty sure the giraffe stuffed toy is going to be baby’s best friend growing up!
Make your nursing sofa or chair less of a hassle to clean with a custom slipcover that you can just remove, throw in the wash and throw back on looking brand new. Take our sofa and armchair sofa slipcover fabrics for a test run here:
You might not know it by its name, but I’m willing to bet that you know what it looks like.
Inspired by the design of industrial factories during the early 1800s, the industrial aesthetic incorporates many popular building materials at the time such as brick, steel, and concrete.
Throughout this post, we’ll be taking a closer look at this look and how you can incorporate the look into your own space.
Let’s dive in:
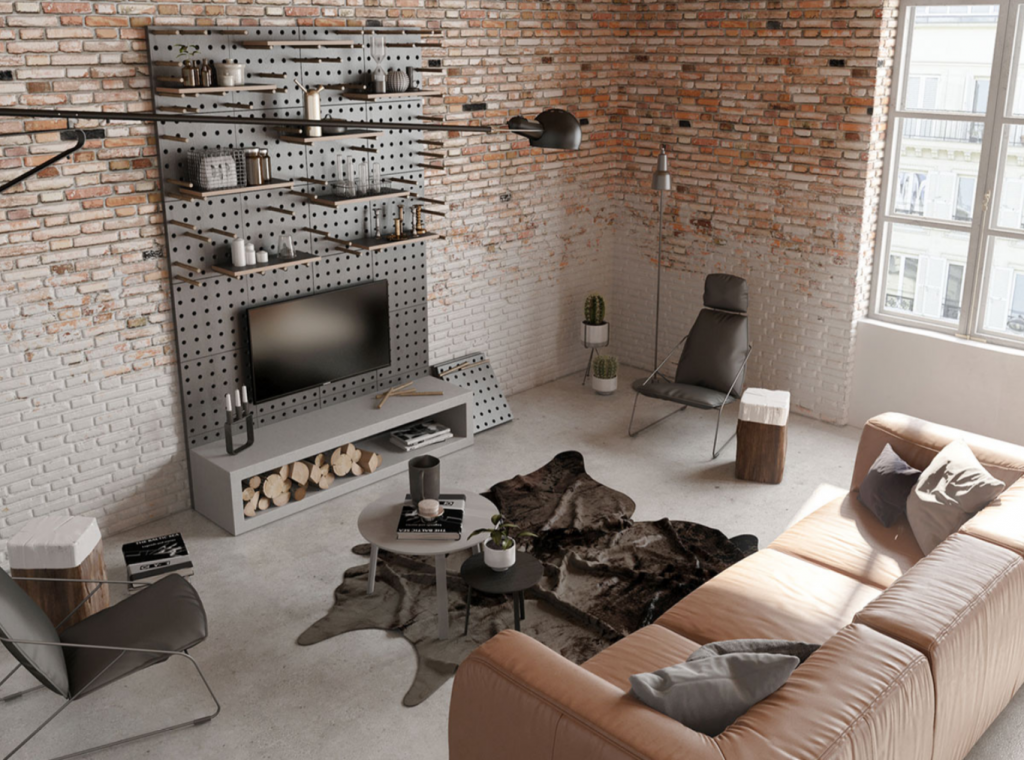
The colours
vizn.sk
If you want to pull off the industrial look at home, the first thing you need to nail down is the colour palette.
The industrial look is well-known for its use of materials such as wood, concrete, and steel in its designs, which is why the dominant colours in most industrial designs are in neutral tones like brown, beige, burnt orange, black, grey, and occasionally dark green.
If you look at this stunning space designed by Vizn Studios — a creative studio specializing in architecture, you’ll notice how the grey pegboard, coffee table, and TV stand, along with the brown leather sofa, side tables, and shelves, complement the surrounding exposed brick walls and concrete floors.
The materials
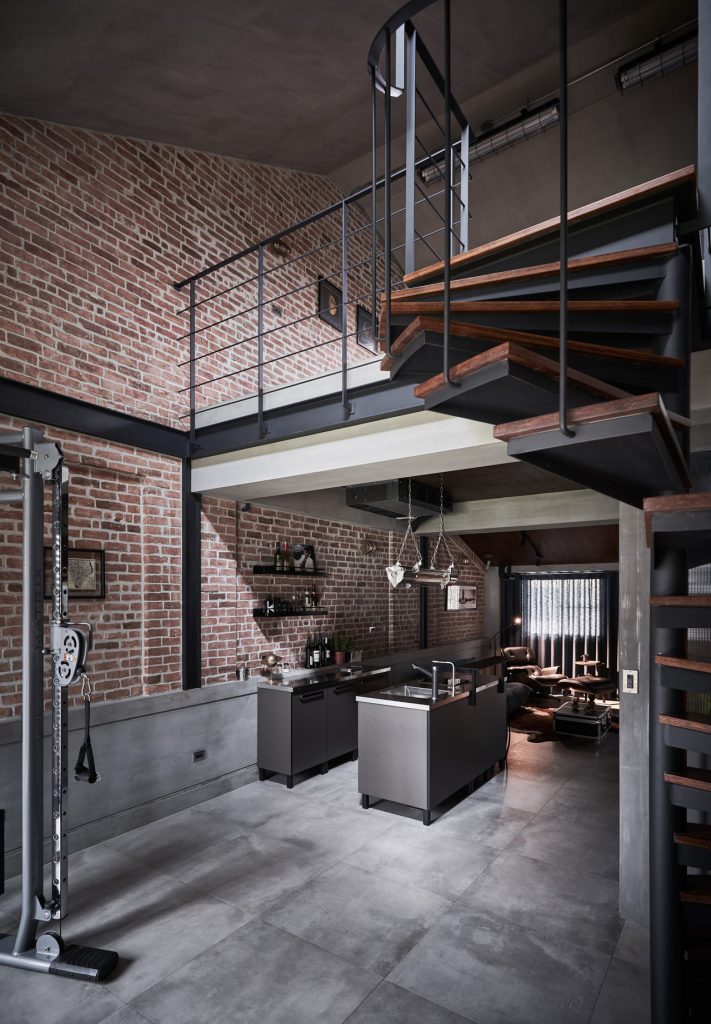
haodesign.tw
When it comes to materials, the strong presence of wood, brick, steel, and concrete materials can be found in any Industrial-themed interior.
Taiwan-based HAO Design studios helped a young family convert this attic space into an industrial-style loft complete with a spiral staircase, high ceilings, exposed brick and steel frames, all of which are reminiscent of how industrial factories in the early 19th century were designed.
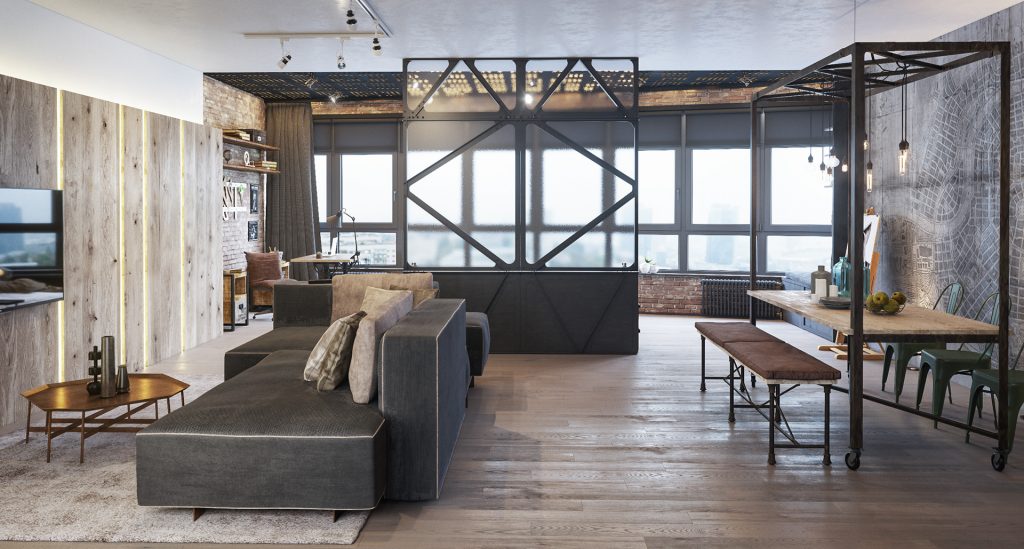
The furniture
behance.net
When it comes to industrial-style furniture, there are a few things to look out for besides colour and material.
Unlike Scandinavian or contemporary-style interiors, the industrial look boasts a raw and unfinishedlook with an emphasis on exposed brick walls, pipes and even air ducts.
The more raw, the better.
For example, in this Ukranian loft apartment designed by architect and 3D artist Anjey Misoanyuk, you can see how the raw and unfinished qualities also extend into the furniture.
Pieces like shelves are outlined with a steel frame, lightbulbs work without housing, and chairs with steel pipes as legs are all things that go with the industrial aesthetic.
Overall, the industrial look is robust, rustic, vintage, and sophisticated all rolled into one, making it one of our favourite looks in a living space. It effortlessly blends opposing materials like wood, brick, steel, and concrete to make a space that is greater than the sum of its parts.
For more home decorating tips that you can put to use without breaking the bank, get a copy of our FREE Timeless Living: How To Design A Classy IKEA- Inspired Home ebook:
SEND ME A COPY
Sofa struggles? We've got you covered.
From pet mishaps to everyday spills, our sofa covers tackle life's little messes effortlessly.